- Home
- Monitoring
- Create Monitor
Create a Monitor
Overview
A monitor is a tool that regularly checks the availability, performance, and uptime of your website or web service. By creating a monitor, you can get alerted in real-time when your site experiences downtime or performance issues.
Monitor Setup Overview
The maximum number of monitors you can create depends on your subscription.
To create a new monitor, you must first have a project selected.
Creating a Monitor
- Click on "+ Create a new monitor".
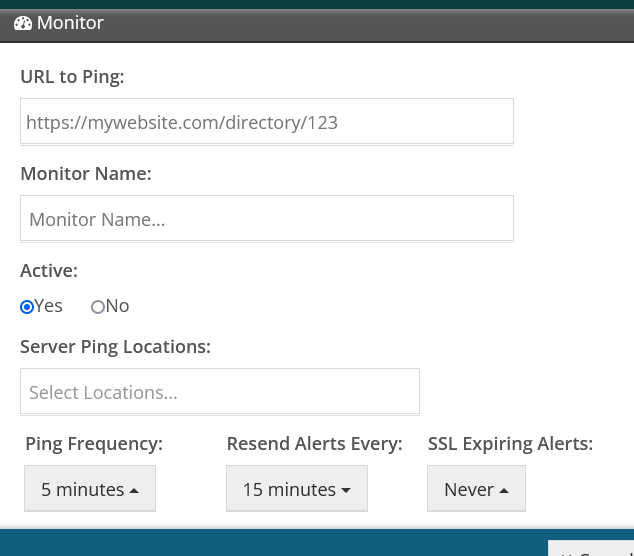
- Enter a valid URL to ping. This should include the application protocol (e.g., http, https, ftp, smtp, and others).
- Enter a readable name for this monitor. This is what will show up on your status page. If left blank, the URL will be used as the name.
- Set the monitor's status as Active by selecting "Yes" or "No".
- Select your server ping locations. These are the locations from where your website will be checked. Choosing multiple locations helps ensure that you receive accurate downtime alerts.
- Set your ping frequency, which can range from as low as 30 seconds to 1x a day. This determines how often your website will be checked for uptime.
- Configure the resend downtime alerts frequency. This is how often alerts are resent when the website is still down.
- Select when you should be alerted about your SSL expiring, with options ranging from 1 day to 30 days.
Advanced Settings

Protocol
Select the protocol to use for monitoring: HTTP(S), Port, or ICMP.
- HTTP(S): This protocol is used for monitoring websites or web services. It checks for the availability and response time of a site.
- Port: This protocol is used to check if a specific port on a server is open and responding. This is useful for monitoring services such as databases, mail servers, or other applications that rely on specific ports.
- ICMP: This protocol is used to send a simple ping request to a server or IP address to check if it's online and responding.
-
Method: Choose between GET, POST, PUT, HEAD, DELETE, PATCH, or OPTIONS. Each method represents a different type of request to be made to the monitored URL.
- GET: Requests data from the specified URL.
- POST: Submits data to the specified URL for processing.
- PUT: Updates an existing resource at the specified URL.
- HEAD: Requests header information without the body.
- DELETE: Deletes the specified resource.
- PATCH: Applies partial modifications to a resource.
- OPTIONS: Requests communication options available for the specified URL.
-
Follow redirects: Choose whether to follow redirects when pinging a website. If set to "Yes", the monitor will follow redirects until it reaches the final destination. This can be helpful to ensure that your site is working as intended, even if it's redirecting users to another URL.
-
Expected status code: Select the status code that should be returned on the ping request. The default is 200-299, which indicates successful requests. You can also select a specific status code if you expect a different response. If the site returns a code other than what is expected, this is treated as a website being down, and you will be alerted.
- 200-299: These status codes indicate successful HTTP requests. Common ones include 200 (OK), 201 (Created), and 204 (No Content).
-
HTTP request body parameters: Specify the data to be passed in the HTTP request body to the URL. This can be JSON, XML, form parameters, or raw data. This may be used for security purposes, data submission, or other reasons depending on your specific use case.
-
HTTP request headers: Submit any HTTP headers by entering both the field name and value. These headers are expected during HTTP requests and may be used for security, authentication, or other reasons.